

Products in this catalogue
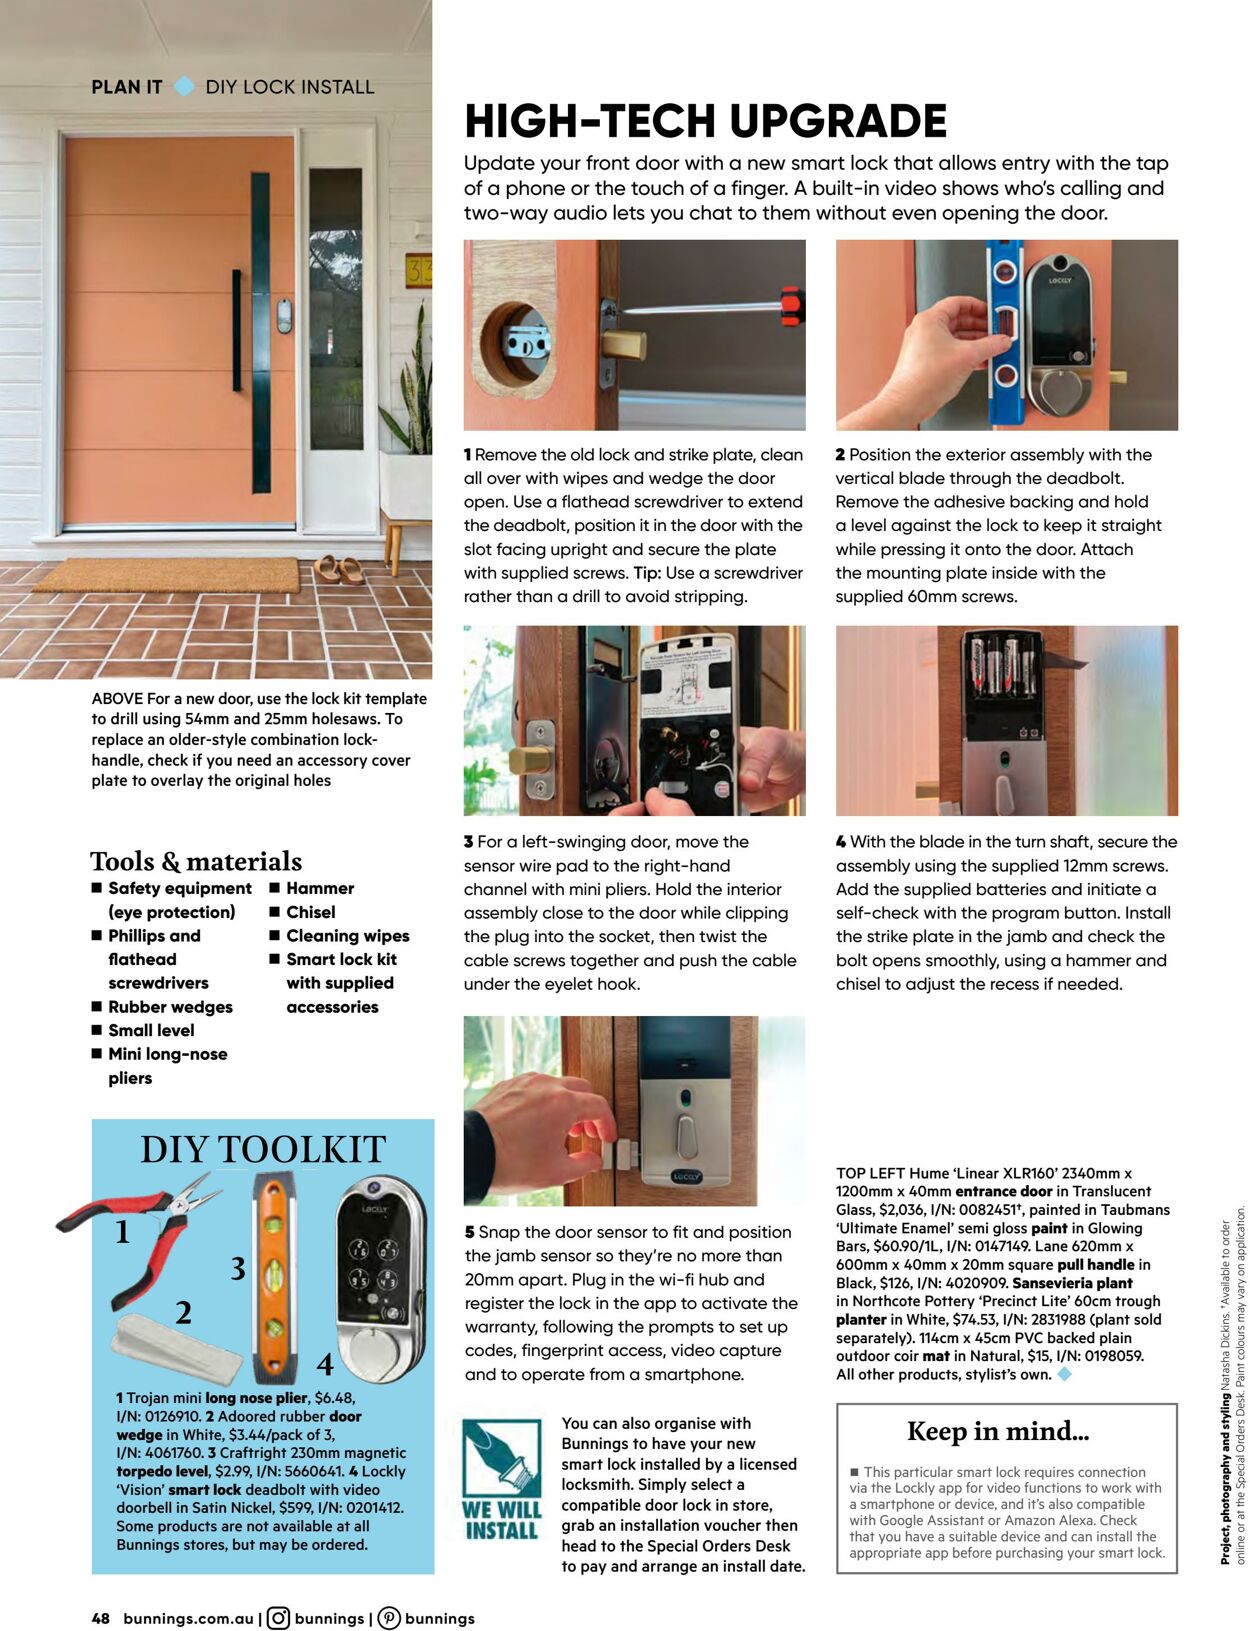
PLANIT = DIYLOCK INSTALL ABOVE For a new door, use the lock kit template to drill using 54mm and 25mm holesaws. To replace an older-style combination lock- handle, check if you need an accessory cover plate to overlay the original holes Tools & materials ™ Safety equipment ™ Hammer (eye protection) ™ Chisel & Phillips and ™ Cleaning wipes flathead ™ Smart lock kit screwdrivers with supplied ™ Rubber wedges accessories ™ Small level ™ Mini long-nose pliers HIGH-TECH UPGRADE Update your front door with a new smart lock that allows entry with the tap of a phone or the touch of a finger. A built-in video shows who's calling and two-way audio lets you chat to them without even opening the door. 1Remove the old lock and strike plate, clean all over with wipes and wedge the door open. Use a flathead screwdriver to extend the deadbolt, position it in the door with the slot facing upright and secure the plate with supplied screws. Tip: Use a screwdriver rather than a drill to avoid stripping. 3 For a left-swinging door, move the sensor wire pad to the right-hand channel with mini pliers. Hold the interior assembly close to the door while clipping the plug into the socket, then twist the cable screws together and push the cable under the eyelet hook. i 5 Snap the door sensor to fit and position the jamb sensor so they're no more than 20mm apart. Plug in the wi-fi hub and register the lock in the app to activate the warranty, following the prompts to set up codes, fingerprint access, video capture ‘and to operate from a smartphone. You can also organise with Bunnings to have your new smart lock installed by a licensed locksmith. Simply select a compatible door lock in store, grab an installation voucher then head to the Special Orders Desk WE WILL INSTALL to pay and arrange an install date. 48 bunnings.com.au | (©) bunnings | ®) bunnings a 2 Position the exterior assembly with the vertical blade through the deadbolt. Remove the adhesive backing and hold a level against the lock to keep it straight while pressing it onto the door. Attach the mounting plate inside with the supplied 60mm screws. 4 With the blade in the turn shaft, secure the assembly using the supplied 12mm screws. Add the supplied batteries and initiate a self-check with the program button. Install the strike plate in the jamb and check the bolt opens smoothly, using a hammer and chisel to adjust the recess if needed. TOP LEFT Hume ‘Linear XLR160" 2340mm x 1200mm x 40mm entrance door in Translucent Glass, $2,036, I/N: 0082451", painted in Taubmans ‘Ultimate Enamel’ semi gloss paint in Glowing Bars, $60.90/IL, I/N: 0147149. Lane 620mm x 600mm x 40mm x 20mm square pull handle in Black, $126, I/N: 4020909. Sansevieria plant in Northcote Pottery ‘Precinct Lite’ 60cm trough planter in White, $74.53, I/N: 2831988 (plant sold separately). 114cm x 45cm PVC backed plain outdoor coir mat in Natural, $15, I/N: 0198059. All other products, stylist’s own. Keep in mind. = This particular smart lock requires connection via the Lockly app for video functions to work with a smartphone or device, and it’s also compatible with Google Assistant or Amazon Alexa. Check that you have a suitable device and can install the appropriate app before purchasing your smart lock. Project, photography and styling Natasha Dickins. "Available to order ‘online or at the Special Orders Desk. Paint colours may vary on application.
| Name | Details |
|---|