Christmas 2024
The query has to be between 2 and 50 characters
Advertisement
Advertisement

Current catalogue Bunnings Warehouse - Valid from 01.11 to 30.11 - Page nb 86

Advertisement
Advertisement
Advertisement
Advertisement
Catalogue Bunnings Warehouse 01.11.2022 - 30.11.2022
Advertisement
Advertisement
Advertisement

Products in this catalogue

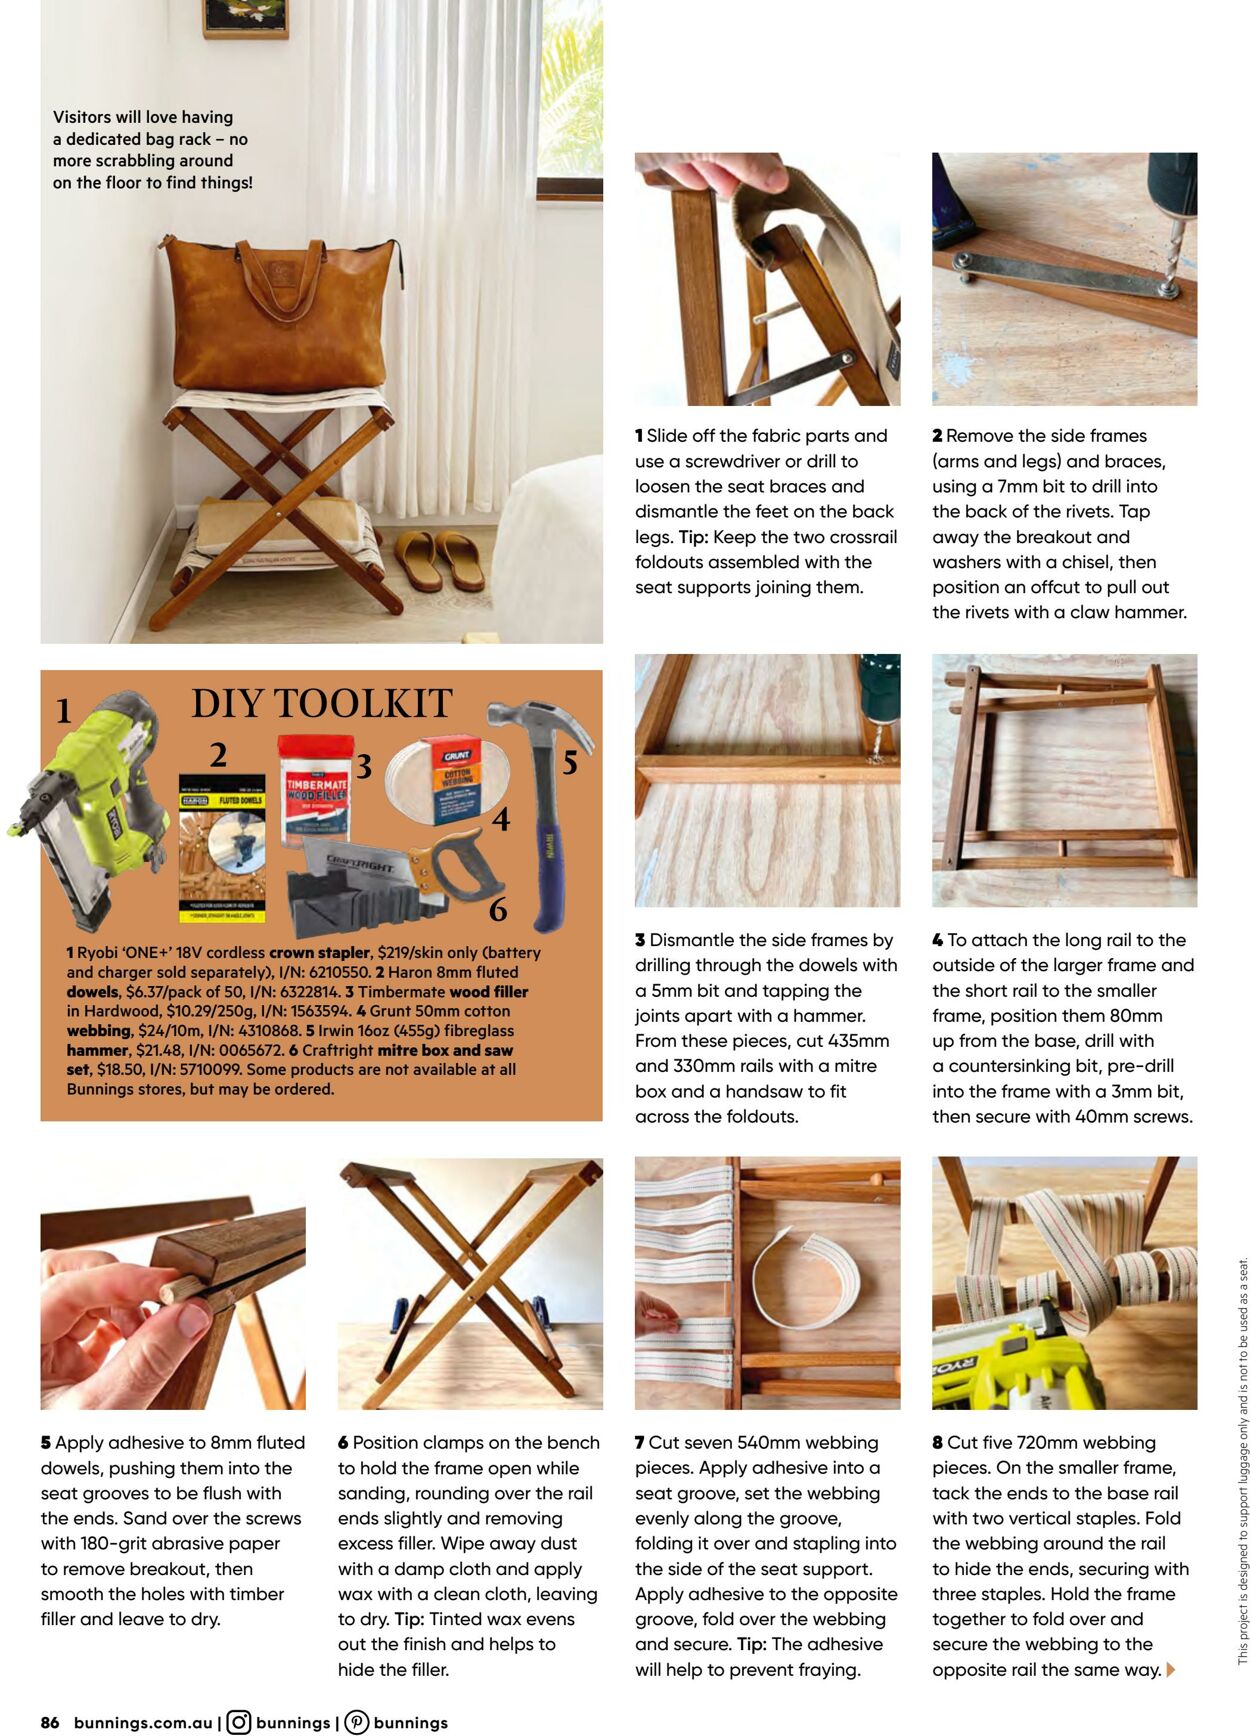
Visitors will love having a dedicated bag rack - no more scrabbling around ‘on the floor to find things! ‘41Ryobi ‘ONE+’ 18V cordless crown stapler, $219/skin only (battery and charger sold separately), |/N: 6210550. 2 Haron 8mm fluted dowels, $6.37/pack of 50, I/N: 6322814. 3 Timbermate wood filler in Hardwood, $10.29/250g, I/N: 1563594. & Grunt 50mm cotton webbing, $24/10m, /N: 4310868. 5 Irwin 160z (4559) fibreglass hammer, $21.48, I/N: 0065672. 6 aftright mitre box and saw set, $18.50, I/N: 5710099. Some products are not available at all Bunnings stores, but may be ordered. 1Slide off the fabric parts and use a screwdriver or drill to loosen the seat braces and dismantle the feet on the back legs. Tip: Keep the two crossrail foldouts assembled with the seat supports joining them. 3 Dismantle the side frames by drilling through the dowels with a Smm bit and tapping the joints apart with a hammer. From these pieces, cut 435mm and 330mm rails with a mitre box and a handsaw to fit across the foldouts. 2 Remove the side frames (arms and legs) and braces, using a 7mm bit to drill into the back of the rivets. Tap away the breakout and washers with a chisel, then Position an offcut to pull out the rivets with a claw hammer. 4To attach the long rail to the outside of the larger frame and the short rail to the smaller frame, position them 80mm up from the base, drill with a countersinking bit, pre-drill into the frame with a 3mm bit, then secure with 40mm screws. 5 Apply adhesive to 8mm fluted dowels, pushing them into the seat grooves to be flush with the ends. Sand over the screws with 180-grit abrasive paper to remove breakout, then smooth the holes with timber filler and leave to dry. 6 Position clamps on the bench to hold the frame open while sanding, rounding over the rail ends slightly and removing excess filler. Wipe away dust with a damp cloth and apply wax with a clean cloth, leaving to dry. Tip: Tinted wax evens out the finish and helps to hide the filler. 86 bunnings.com.au | (O) bunnings | () bunnings 7 Cut seven 540mm webbing pieces. Apply adhesive into a seat groove, set the webbing evenly along the groove, folding it over and stapling into the side of the seat support. Apply adhesive to the opposite groove, fold over the webbing and secure. Tip: The adhesive will help to prevent fraying. 8 Cut five 720mm webbing pieces. On the smaller frame, tack the ends to the base rail with two vertical staples. Fold the webbing around the rail to hide the ends, securing with three staples. Hold the frame together to fold over and secure the webbing to the opposite rail the same way. This project is designed to support luggage only and is not to be used as a seat.

Latest catalogues

Advertisement
Visitors will love having a dedicated bag rack - no more scrabbling around ‘on the floor to find things! ‘41Ryobi ‘ONE+’ 18V cordless crown stapler, $219/skin only (battery and charger sold separately), |/N: 6210550. 2 Haron 8mm fluted dowels, $6.37/pack of 50, I/N: 6322814. 3 Timbermate wood filler in Hardwood, $10.29/250g, I/N: 1563594. & Grunt 50mm cotton webbing, $24/10m, /N: 4310868. 5 Irwin 160z (4559) fibreglass hammer, $21.48, I/N: 0065672. 6 aftright mitre box and saw set, $18.50, I/N: 5710099. Some products are not available at all Bunnings stores, but may be ordered. 1Slide off the fabric parts and use a screwdriver or drill to loosen the seat braces and dismantle the feet on the back legs. Tip: Keep the two crossrail foldouts assembled with the seat supports joining them. 3 Dismantle the side frames by drilling through the dowels with a Smm bit and tapping the joints apart with a hammer. From these pieces, cut 435mm and 330mm rails with a mitre box and a handsaw to fit across the foldouts. 2 Remove the side frames (arms and legs) and braces, using a 7mm bit to drill into the back of the rivets. Tap away the breakout and washers with a chisel, then Position an offcut to pull out the rivets with a claw hammer. 4To attach the long rail to the outside of the larger frame and the short rail to the smaller frame, position them 80mm up from the base, drill with a countersinking bit, pre-drill into the frame with a 3mm bit, then secure with 40mm screws. 5 Apply adhesive to 8mm fluted dowels, pushing them into the seat grooves to be flush with the ends. Sand over the screws with 180-grit abrasive paper to remove breakout, then smooth the holes with timber filler and leave to dry. 6 Position clamps on the bench to hold the frame open while sanding, rounding over the rail ends slightly and removing excess filler. Wipe away dust with a damp cloth and apply wax with a clean cloth, leaving to dry. Tip: Tinted wax evens out the finish and helps to hide the filler. 86 bunnings.com.au | (O) bunnings | () bunnings 7 Cut seven 540mm webbing pieces. Apply adhesive into a seat groove, set the webbing evenly along the groove, folding it over and stapling into the side of the seat support. Apply adhesive to the opposite groove, fold over the webbing and secure. Tip: The adhesive will help to prevent fraying. 8 Cut five 720mm webbing pieces. On the smaller frame, tack the ends to the base rail with two vertical staples. Fold the webbing around the rail to hide the ends, securing with three staples. Hold the frame together to fold over and secure the webbing to the opposite rail the same way. This project is designed to support luggage only and is not to be used as a seat.
Advertisement
Advertisement

If you continue to browse this website, you accept the use of cookies.

Name Details