The query has to be between 2 and 50 characters


Products in this catalogue
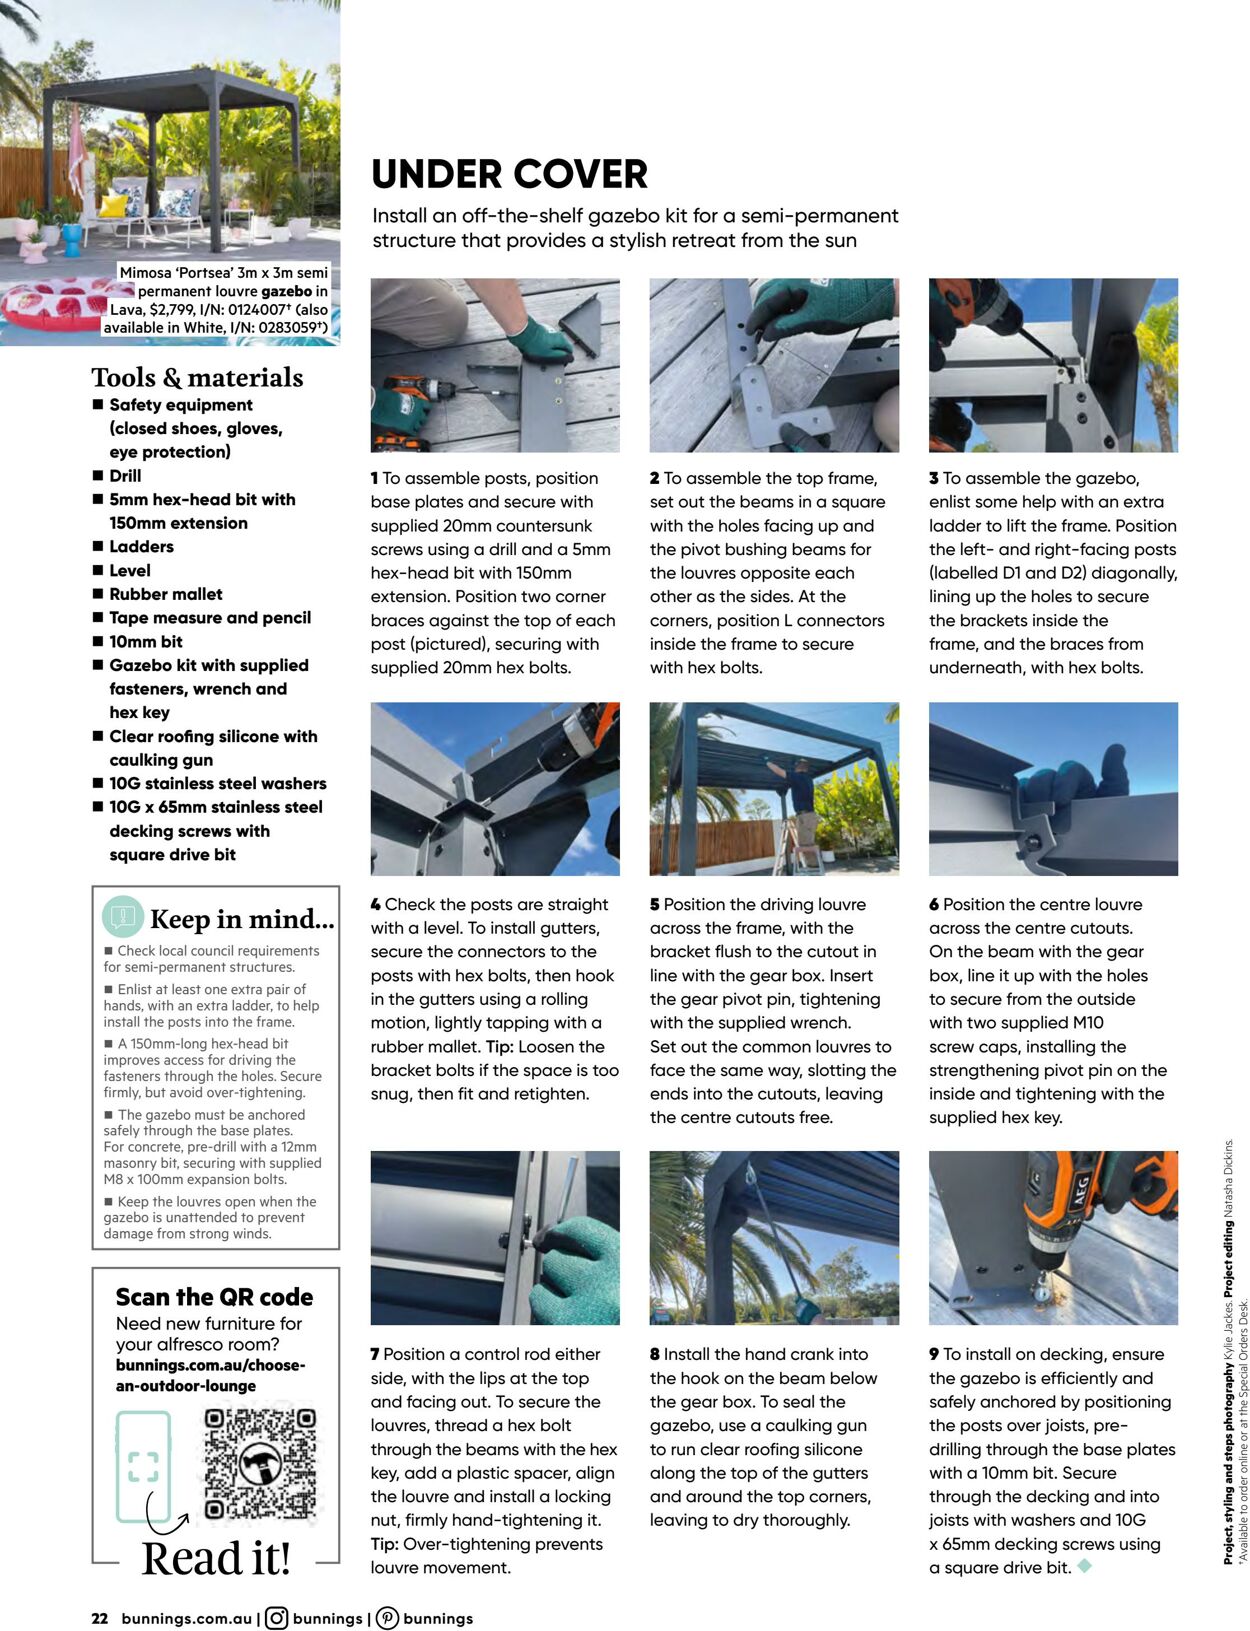
Mimosa ‘Portsea’ 3m x 3m semi | =m _ permanent louvre gazebo in Lava, $2,799, I/N: 0124007" (also 3 available in White, I/N: 0283059") a Tools & materials ™ Safety equipment (closed shoes, gloves, eye protection) @ Drill = 5mm hex-head bit with 150mm extension ™ Ladders @ Level ™ Rubber mallet ™ Tape measure and pencil = 10mm bit ™ Gazebo kit with supplied fasteners, wrench and hex key ™ Clear roofing silicone with caulking gun ™ 10G stainless steel washers ™ 10G x 65mm stainless steel decking screws with square drive bit faa . : __ Keep in mind... ® Check local council requirements for semi-permanent structures. = Enlist at least one extra pair of hands, with an extra ladder, to help install the posts into the frame. = A 150mm-long hex-head bit improves access for driving the fasteners through the holes. Secure firmly, but avoid over-tightening. ™ The gazebo must be anchored safely through the base plates. For concrete, pre-drill with a 12mm masonry bit, Securing with supplied MB x 100mm expansion bolts. ™ Keep the louvres open when the gazebo is unattended to prevent damage from strong winds. Scan the QR code Need new furniture for your alfresco room? bunnings.com.au/choose- an-outdoor-lounge _ Readit! — UNDER COVER Install an off-the-shelf gazebo kit for a semi-permanent structure that provides a stylish retreat from the sun 1To assemble posts, position base plates and secure with supplied 20mm countersunk screws using a drill and a 5mm hex-head bit with 150mm extension. Position two corner braces against the top of each post (pictured), securing with supplied 20mm hex bolts. 4 Check the posts are straight with a level. To install gutters, secure the connectors to the posts with hex bolts, then hook in the gutters using a rolling motion, lightly tapping with a rubber mallet. Tip: Loosen the bracket bolts if the space is too snug, then fit and retighten. 7 Position a control rod either side, with the lips at the top and facing out. To secure the louvres, thread a hex bolt through the beams with the hex key, add a plastic spacer, align the louvre and install a locking nut, firmly hand-tightening it. Tip: Over-tightening prevents louvre movement. 22. bunnings.com.au | (6) bunnings | ®) bunnings 2To assemble the top frame, set out the beams in a square with the holes facing up and the pivot bushing beams for the louvres opposite each other as the sides. At the comers, position L connectors inside the frame to secure with hex bolts. 5 Position the driving louvre across the frame, with the bracket flush to the cutout in line with the gear box. Insert the gear pivot pin, tightening with the supplied wrench. Set out the common louvres to face the same way, slotting the ends into the cutouts, leaving the centre cutouts free. 8 Install the hand crank into the hook on the beam below the gear box. To seal the gazebo, use a caulking gun to run clear roofing silicone along the top of the gutters and around the top corners, leaving to dry thoroughly. 3 To assemble the gazebo, enlist some help with an extra ladder to lift the frame. Position the left- and right-facing posts (labelled D1 and D2) diagonally, lining up the holes to secure the brackets inside the frame, and the braces from underneath, with hex bolts. 6 Position the centre louvre across the centre cutouts. On the beam with the gear box, line it up with the holes to secure from the outside with two supplied M10 screw caps, installing the strengthening pivot pin on the inside and tightening with the supplied hex key. lackes. Project editing Natasha Dickins 9 To install on decking, ensure the gazebo is efficiently and safely anchored by positioning the posts over joists, pre- drilling through the base plates with a 10mm bit. Secure through the decking and into joists with washers and 10G x 65mm decking screws using a square drive bit. © Project, styling and steps photography K\/


| Name | Details |
|---|