
Christmas 2024
The query has to be between 2 and 50 characters
Advertisement
Advertisement

Current catalogue Bunnings Warehouse - Valid from 01.06 to 31.12 - Page nb 71

Advertisement
Advertisement
Advertisement
Advertisement
Catalogue Bunnings Warehouse 01.06.2022 - 31.12.2022
Advertisement
Advertisement
Advertisement

Products in this catalogue

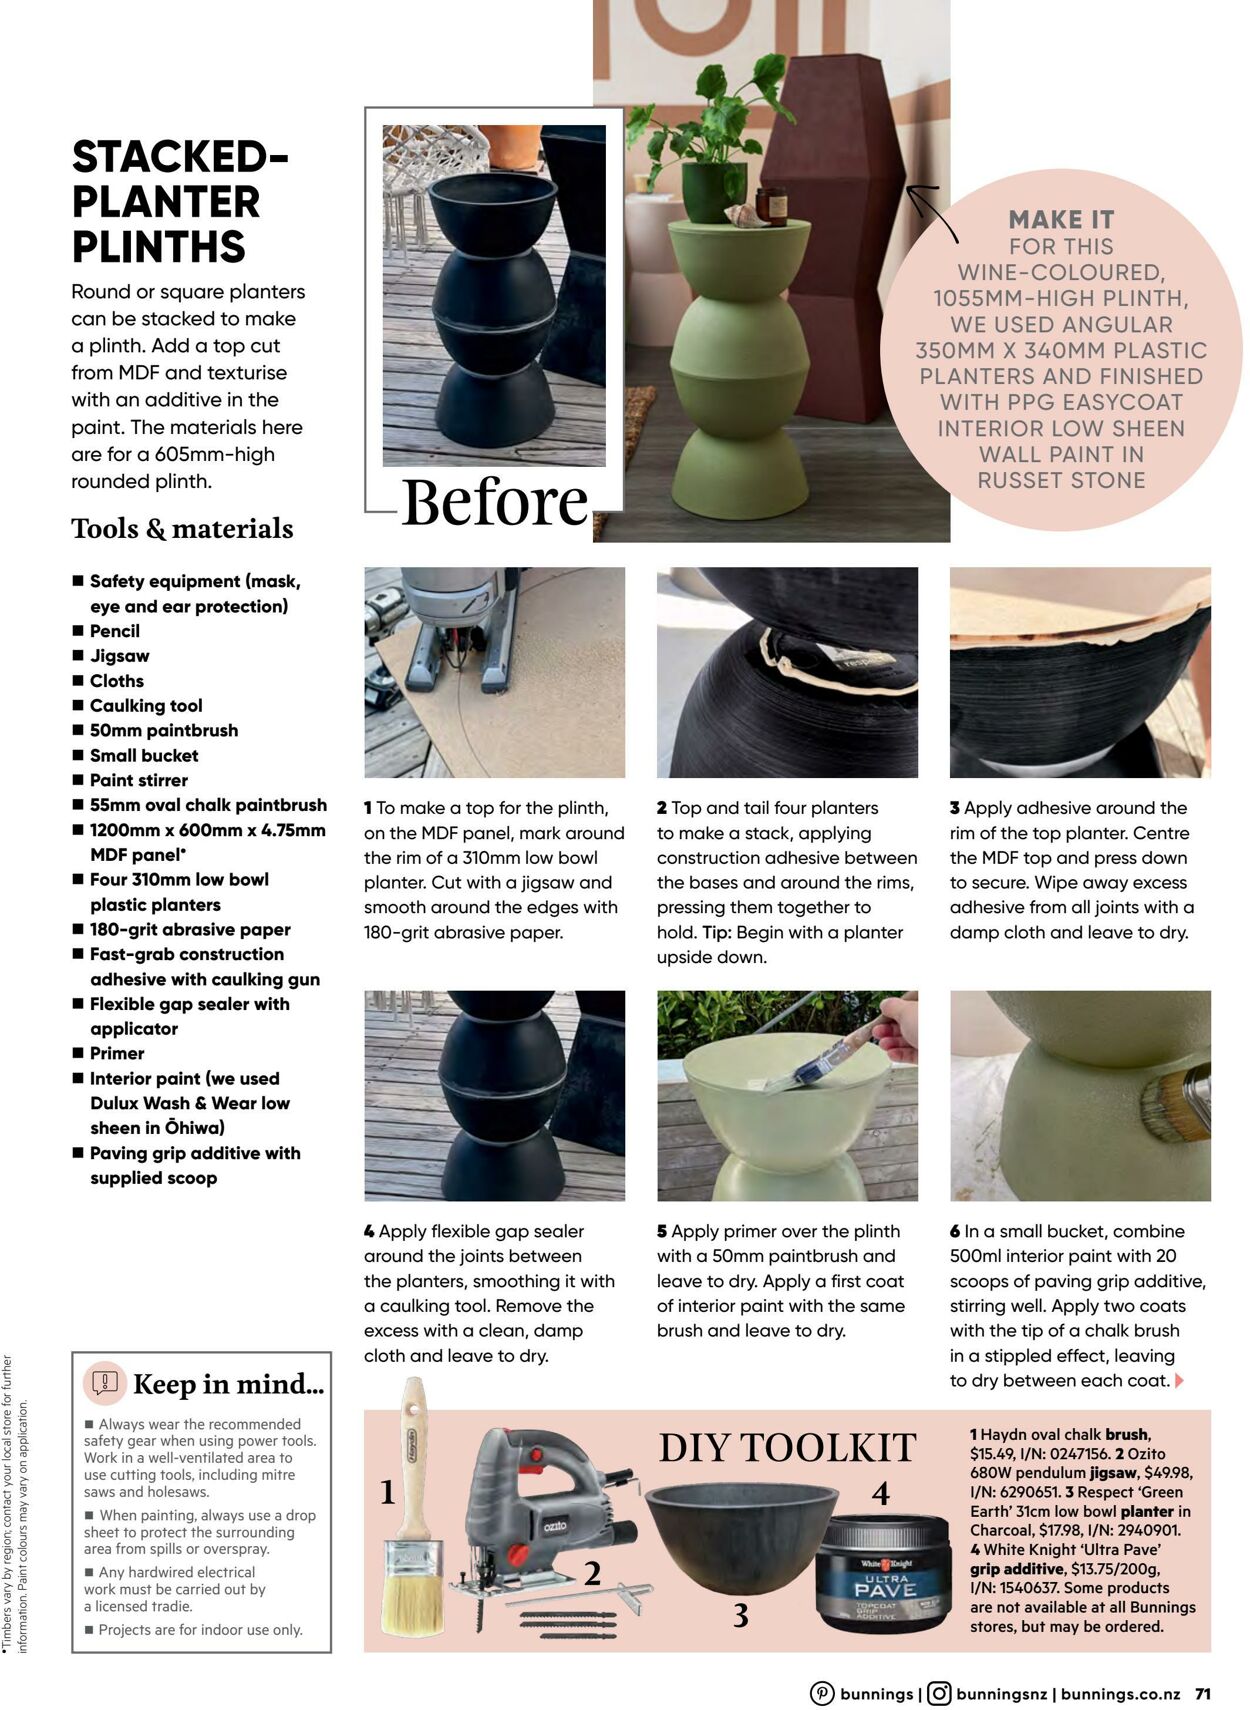
information, Paint colours may vary on appl STACKED- PLANTER PLINTHS Round or square planters can be stacked to make a plinth. Add a top cut from MDF and texturise with an additive in the paint. The materials here are for a 605mm-high rounded plinth. Tools & materials ™ Safety equipment (mask, eye and ear protection) @ Pencil § Jigsaw ™ Cloths @ Caulking tool = 50mm paintbrush @ Small bucket @ Paint stirrer ™ 55mm oval chalk paintbrush @ 1200mm x 600mm x 4.75mm MDF panel* @ Four 310mm low bowl plastic planters ™ 180-grit abrasive paper ™ Fast-grab construction adhesive with caulking gun ™ Flexible gap sealer with applicator @ Primer & Interior paint (we used Dulux Wash & Wear low sheen in Ohiwa) ™ Paving grip additive with supplied scoop Keep in mind... ™ Always wear the recommended safety gear when using power tools. Work in a well-ventilated area to use cutting tools, including mitre saws and holesaws. = When painting, always use a drop sheet to protect the surrounding area from spills or overspray. Any hardwired electrical work must be carried out by a licensed tradie. 1 Projects are for indoor use only. MAKE IT FOR THIS WINE-COLOURED, 1055MM-HIGH PLINTH, WE USED ANGULAR 350MM X 340MM PLASTIC PLANTERS AND FINISHED WITH PPG EASYCOAT INTERIOR LOW SHEEN WALL PAINT IN RUSSET STONE 1To make a top for the plinth, on the MDF panel, mark around the rim of a 310mm low bowl planter. Cut with a jigsaw and smooth around the edges with 180-grit abrasive paper. 2 Top and tail four planters to make a stack, applying construction adhesive between the bases and around the rims, pressing them together to hold. Tip: Begin with a planter upside down. 3 Apply adhesive around the rim of the top planter. Centre the MDF top and press down to secure. Wipe away excess adhesive from all joints with a damp cloth and leave to dry. & Apply flexible gap sealer around the joints between the planters, smoothing it with a caulking tool. Remove the excess with a clean, damp cloth and leave to dry. 5 Apply primer over the plinth with a SOmm paintbrush and leave to dry. Apply a first coat of interior paint with the same brush and leave to dry. DIY TOOLKIT 6 In a small bucket, combine 500ml interior paint with 20 scoops of paving grip additive, stirring well. Apply two coats with the tip of a chalk brush in a stippled effect, leaving to dry between each coat. ‘41Haydn oval chalk brush, $15.49, I/N: 0247156. 2 Ozito 680W pendulum jigsaw, $4998, I/N: 6290651. 3 Respect ‘Green Earth’ 31cm low bow! planter in Charcoal, $17.98, I/N: 2940901. 4 White Knight ‘Ultra Pave’ grip additive, $13.75/200g, I/N: 1540637. Some products are not available at all Bunnings stores, but may be ordered. ® bunnings |G) bunningsnz | bunnings.co.nz_71

Latest catalogues

Advertisement
information, Paint colours may vary on appl STACKED- PLANTER PLINTHS Round or square planters can be stacked to make a plinth. Add a top cut from MDF and texturise with an additive in the paint. The materials here are for a 605mm-high rounded plinth. Tools & materials ™ Safety equipment (mask, eye and ear protection) @ Pencil § Jigsaw ™ Cloths @ Caulking tool = 50mm paintbrush @ Small bucket @ Paint stirrer ™ 55mm oval chalk paintbrush @ 1200mm x 600mm x 4.75mm MDF panel* @ Four 310mm low bowl plastic planters ™ 180-grit abrasive paper ™ Fast-grab construction adhesive with caulking gun ™ Flexible gap sealer with applicator @ Primer & Interior paint (we used Dulux Wash & Wear low sheen in Ohiwa) ™ Paving grip additive with supplied scoop Keep in mind... ™ Always wear the recommended safety gear when using power tools. Work in a well-ventilated area to use cutting tools, including mitre saws and holesaws. = When painting, always use a drop sheet to protect the surrounding area from spills or overspray. Any hardwired electrical work must be carried out by a licensed tradie. 1 Projects are for indoor use only. MAKE IT FOR THIS WINE-COLOURED, 1055MM-HIGH PLINTH, WE USED ANGULAR 350MM X 340MM PLASTIC PLANTERS AND FINISHED WITH PPG EASYCOAT INTERIOR LOW SHEEN WALL PAINT IN RUSSET STONE 1To make a top for the plinth, on the MDF panel, mark around the rim of a 310mm low bowl planter. Cut with a jigsaw and smooth around the edges with 180-grit abrasive paper. 2 Top and tail four planters to make a stack, applying construction adhesive between the bases and around the rims, pressing them together to hold. Tip: Begin with a planter upside down. 3 Apply adhesive around the rim of the top planter. Centre the MDF top and press down to secure. Wipe away excess adhesive from all joints with a damp cloth and leave to dry. & Apply flexible gap sealer around the joints between the planters, smoothing it with a caulking tool. Remove the excess with a clean, damp cloth and leave to dry. 5 Apply primer over the plinth with a SOmm paintbrush and leave to dry. Apply a first coat of interior paint with the same brush and leave to dry. DIY TOOLKIT 6 In a small bucket, combine 500ml interior paint with 20 scoops of paving grip additive, stirring well. Apply two coats with the tip of a chalk brush in a stippled effect, leaving to dry between each coat. ‘41Haydn oval chalk brush, $15.49, I/N: 0247156. 2 Ozito 680W pendulum jigsaw, $4998, I/N: 6290651. 3 Respect ‘Green Earth’ 31cm low bow! planter in Charcoal, $17.98, I/N: 2940901. 4 White Knight ‘Ultra Pave’ grip additive, $13.75/200g, I/N: 1540637. Some products are not available at all Bunnings stores, but may be ordered. ® bunnings |G) bunningsnz | bunnings.co.nz_71
Advertisement
Advertisement

If you continue to browse this website, you accept the use of cookies.

Name Details